
All aquarists live with the constant fear of a power failure. To overcome this it is often useful to purchase an uninterruptible power supply that can allow us to keep the movement and ascent pumps active so as not to drop the dissolved oxygen in the tank too much, which could cause the collapse of our aquarium in a few hours.
Uninterruptible power supplies however have a duration limited to a few hours, unless you buy very expensive ones. The latter are also very bulky and uncomfortable to keep in our furniture already full of equipment.
We can therefore think of adding a system of some kind to a relatively inexpensive UPS that can warn us if the power goes out.
There are several commercial products that help us to do it, but what I explain to you today is a very cheap way (about € 5) to create a system that can notify us via email in case I go out of power.
To do this we will use a Nodemcu, an arduino-like board that allows us to send a report to this site every 2 minutes. If no report arrives within 5 minutes, the site will send an email to notify us of the problem. Extremely simple and above all FREE
All you need is a Nodemcu that you can buy for a few euros on Amazon:
Let’s see how:
First, get all the necessary software. You must download the firmware from this same site: firmware.bin
Then we download the drivers (which are not always to be installed) of the nodemcu: drivers
Finally we download the flasher compatible with your system: flasher.
Connect the nodemcu to the computer with a microusb cable (the same for 90% of mobile phones).
After a few seconds the computer should recognize our nodemcu and add it to the devices. To check that this has happened, click with the right mouse button in the lower left corner (on the start button) and go to device management.
You should find a new device under Ports (COM and LPT) whose name ends with COMX where X is a number (eg: COM3 COM12 etc). Mark this number, you will need it later.
If you do not recognize the device, we need to download and install the drivers that you can find at this address: drivers
Once the Nodemcu is correctly recognized we just have to open the Flasher and set it as in this image:
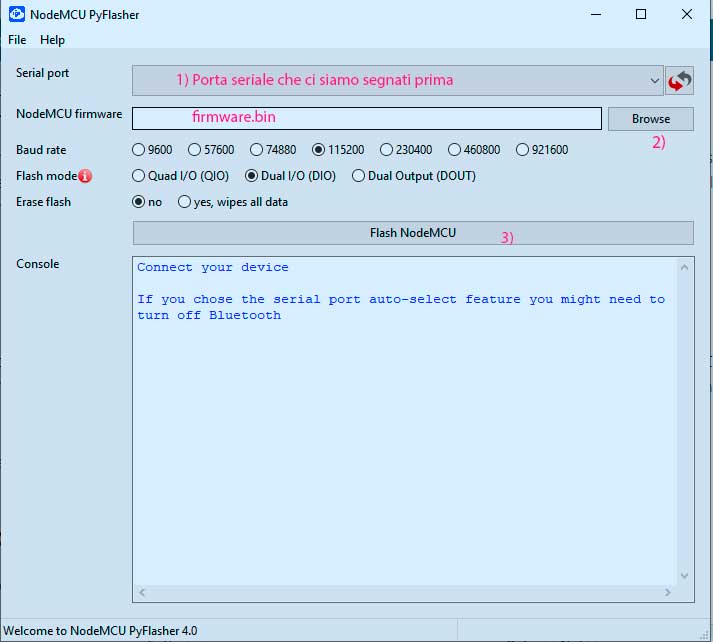
That is, in the first field select the serial port related to your Nodemcu, the one we marked before.
In the “nodemcu firmware” field click on browse and go to select the firmware.bin you downloaded from here.
Check that Baud Rate is 115200, Flash mode is set to Dual and click Flash NodeMCU.
After a few seconds the game is done. Disconnect the dosometer and set it aside for a second.
It is now necessary to register to the site that we will use as an interface:

Connect to http://iot.joy-reef.com and register with your personal data.
I recommend you write down the username and password you set during registration

You will receive a confirmation email to confirm your registration.
Now turn on the dosing pump:
Looking in wifi on your computer or mobile phone you should find a wifi named Joyreef.
Connect to this wifi, and this page should open directly:

If it does not open, while you are connected to the Joyreef wifi, go to any browser and type in the address 192.168.4.1.
Click on Wifi Setup and you will be here:
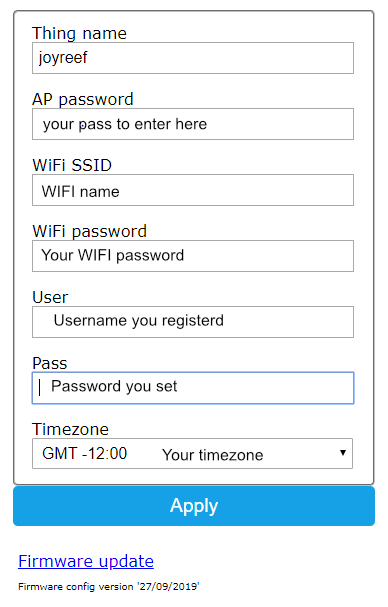
Fill in the details as shown in the image. User and pass are the same ones you used to register on the site.
At this point, apply, wait for confirmation and switch your nodemcu pump off and on again.
I remind you that to be operational it takes about 1 minute after power up.
You have now to enable the alarm, clicking top right and going into my account settings.
Test will not work with this version it is only for dosers.
To test it you have to enable alarm, turn on the nodemcu, and wait an email. Then turn it off, and wait the email again.
Dear Joyreef,
Thank you very much for a wonderful program.
Can I use it only itself (without dosing pump function)?
Thanks again,
Sure you can use it without dosing pump function, just ignore all the dosing functions. Activate the alarm and test it 🙂
Buongiorno , è possibile programmare il nodemcu con mac OS sierra vers.10 oppure con windows 7 ? Grazie
Ciao Salvatore, si seguendo le istruzioni dovresti riuscire a programmarlo sia con sierra sia con win7. Devi solo trovare i driver giusti.
Ciao
Hi tried registering – got this message trying verifying email :
403
Invalid signature.
Hi, really strange…
try to copy paste the verification address in a different browser
Sorted