
Well, did you buy all the pieces? no? then reread the first part. Did you put it all together? no? then follow the second part.
If, on the other hand, you have arrived up here it means that you are really determined to finish the job and you just have to load the software on your device.
You know, the most complex part of an Arduino project is to write the code to make the pieces you have mounted work. But luckily I thought of that. To simplify life even more, I made the firmware to be loaded directly on the Nodemcu directly available to be able to communicate directly with the site and use the dosometric pumps WITHOUT ANY PROGRAMMING COMPETENCE.
You won’t even need to change a line of code to make everything work. All you have to do is load the firmware with 4 simple steps on the device, register on the site, connect the dosometrics to your WIFI, and voila, you’re done.
Let’s see how:
First, get all the necessary software. You must download the firmware from this same site: firmware.bin
Then we download the drivers (which are not always to be installed) of the nodemcu: drivers
Finally we download the flasher compatible with your system: flasher.
Connect the nodemcu to the computer with a microusb cable (the same for 90% of mobile phones).
After a few seconds the computer should recognize our nodemcu and add it to the devices. To check that this has happened, click with the right mouse button in the lower left corner (on the start button) and go to device management.
You should find a new device under Ports (COM and LPT) whose name ends with COMX where X is a number (eg: COM3 COM12 etc). Mark this number, you will need it later.
If you do not recognize the device, we need to download and install the drivers that you can find at this address: drivers
Once the Nodemcu is correctly recognized we just have to open the Flasher and set it as in this image:
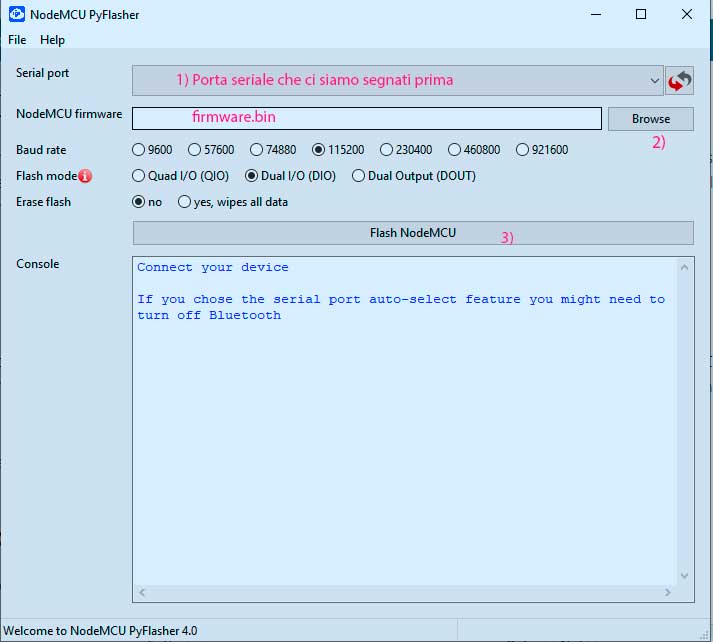
That is, in the first field select the serial port related to your Nodemcu, the one we marked before.
In the “nodemcu firmware” field click on browse and go to select the firmware.bin you downloaded from here.
Check that Baud Rate is 115200, Flash mode is set to Dual and click Flash NodeMCU.
After a few seconds the game is done. Disconnect the dosometer and set it aside for a second.
It is now necessary to register to the site that we will use as an interface:

Connect to http://iot.joy-reef.com and register with your personal data.
I recommend you write down the username and password you set during registration

You will receive a confirmation email to confirm your registration.
Now turn on the dosing pump:
Looking in wifi on your computer or mobile phone you should find a wifi named Joyreef.
Connect to this wifi, and this page should open directly:

If it does not open, while you are connected to the Joyreef wifi, go to any browser and type in the address 192.168.4.1.
Click on Wifi Setup and you will be here:
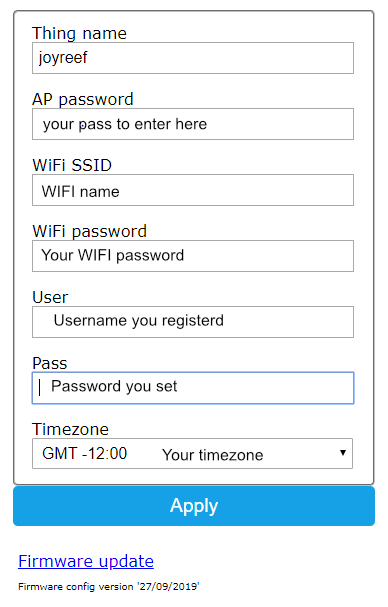
Fill in the details as shown in the image. User and pass are the same ones you used to register on the site.
At this point, apply, wait for confirmation and switch your dosometric pump off and on again.
I remind you that to be operational the pumps always take about 1 minute after power up.
Connect to the site, click on the top right of your name, and click on test connection.
Click on test and check the answer. If the answer is ok, you are done. All you have to do is use the dosometric system.
when I test connection, the error messages appear “Error connecting dosing pump. Check wifi connection!”
I follow your instruction till the end,
can you help me?
Sure i can. First of all double check all the passwords. Be sure to use username and not email in the setup.
hi Danilo thanks for he reply, I have double checked all username and password and still get the error notification, but I do get the notification email of online/offline status from my device, how its possible?
Are you using the power failure module firmware? if yes test does not work till next portal update
Yes im using power faillure module firmware. Should i change the firmware? Which one you recommend? Thanks for the reply. I really appreciate it
Yes im using power faillure module firmware. Should i change the firmware? Which one you recommend? Thanks for the reply. I really appreciate it
The best firmware for power failure is the one you’re using. But the test won’t work until next portal update.
but if you can get alerts via email, it is ok!
Hi Danilo. Would like to try and build this. Can I use Arduino Nano with wifi module?
Hello, no sadly it’s not compatible with many of the libraries i use. You have to buy a nodemcu. But it costs just 2$!! 😀
let me know if you build it!
Thanks i will get one. Will let know when it is complete. Stay safe
Got it all set up but the JoyReef Setup WiFi page shows configuration saved. When I click on return to home page it loops back to Setup Wifi.
Any idea what I am doing wrong?
Hello Andre,
After setting everything up you have to power off / power on the doser.
If after that it still doesn’t work you’re writing something wrong.
Let me know!
Just made It, Works amazingly well.
really Fun and usefull project, thank you!
Thank you for your interest! Please share any pictures of your work!
Hi Danilo, been using this doser for the last year and half flawlessly, it works really well, thank you! Is there a way to dose more than the 1000ml limit per day? (I’m thinking about dosing kalk + balling to elevate my ph, and It would be perfect to use the same doser, cause I have 1 dosing head free at the moment, but for it to work I would need to dose a maximum of 2 to 3l per day)
Hello
I just installed the firmware, I haven’t connected the pumps yet.
And the Test button does not work!
Hello Artem,
If you can’t connect your doser, just check all the users / password you input in configuration. It’s always a problem due to a wrong capital letter or a space before or after passwords. Double check you inputed USERNAME and not EMAIL when asked, and double check again all passwords you inputed.
If you have other problems, don’t esitate to write me, via email too.
Thank You!
Hello
thanks for the answer)
I can’t even log into the WiFi point after I entered “AP password”. Passwords are already simple and correct.
Already 5-6 times I had to reflash the firmware on the controller, after I could not enter after entering the password (
How can the swami get in touch in another way? for example via telegram …
I´m not sure what AP password is and where to find it?
Hi Pali, as i told you via email, it’s a password you have to choose.
You will need it to enter again in the settings
Hello
I am using it well without any inconvenience by doing what I told you in the joy reef site.
I am curious about the software configuration , can you tell me ?
I want to challenge the programing.
Its 2 months since the last person posted and no replies. Guess this site is no longer active and without support i would not attempt this DIY. Great write up though
hallo, i am very interested in this post, but i still don’t see how to see the parameters to do automatic dosing using this tool. Are the dosage settings according to our manual parameter test results?
Sadly, it’s not automated.
You have to do manual test and then use doser to fix them.
In the future there will be a temperature sensor, a ph sensor, an orp sensor and maybe a kh sensor 😉
Hi Danilo,
Finally have it working and it is a great way to control the dosing pumps accurately.
Thank you
Andre
Glad to hear!
Happy reefing!
Hi Danilo, thanks for the guide, I am stuck on the last part trying to flash the nodemcu. It just says connecting and doesn’t seem to flash the drive as far as I can tell.
I’ve tried a few of your dosing pump versions but none seem to work. Can you please help?
Hello Adam, glad to help…
Did you check you can see the nodemcu as COM in the device manager?
If you can’t see it try to install the drivers you can find at: https://github.com/nodemcu/nodemcu-devkit/blob/master/Drivers/CH341SER_WINDOWS.zip
Let me know!
Thanks, I managed to sort it out, pump was working fine from Sept till now. Just this month I have been unable to connect back to the pump no wifi has changed or anything like that. I am trying to reflash but having no luck. I cannot remember what I entered in AP password… do I set this to whatever I like during the set up?
Thanks again, great pump and still a good project even though I need to work on it 🙂
I am also having this issue. I have the drivers installed but regardless of the file it just says connecting and will not progress. I have downloaded all 4 of files you have labeled as dosing pump and none of them have any sort of change or effect. I have also tried leaving them for hours and it never does connect. What could i be doing wrong?
You have to check your drivers.
Look into your device manager if the esp8266 is successfully identified.
You should find a device called COMX under your serial devices.
yes its called COM3 in my case. Do i have to completely remove the wiring from it maybe?
Dear Danilo,
I’ve just found your fantastic project. Thank you for your effort to create this amazing project.
Before ordering all the components to build it, I would like to know if it’s still running, I have tried to register with my email address, but I didn’t receive any mail to complete the registration process.
Grazie Mille
Nissan
Hello,
does the software provide MQTT support?
No sorry, it doesn’t!
Is there a possibility to run it locally instead of via the internet? installed on a raspberry?
Hello, no sorry it’s not possible
Hello Danilo
The website is showing 419 page expired when i try to register.Can u please help me with this.
Come here just to say Hi..
your amazing project very helpfull,,
hope you get health and wealth..
regards from indonesia
Hi Denilo
Thanks for sharing and providing such useful resource… I am successful in making this for my aquarium… initially I struggled a bit with my ESP32… later I realised the program is compatible with ESP8266… also 5V for ESP was heating the IC. I corrected the same by stepping down voltage to 3.5 V.
keep doing such good work…
Regards
Abhishek
Thank you for your support my friend!
I can’t get it to show up in wifi after flashing. Am I wrong in assuming it has something to do with the chip itself as the flash says “Unexpected chip id in image. Expected 0 but value was 1392. Is this image for a different chip model?”. It doesn’t throw any other errors but since I don’t see wifi I’m guessing that is the case. I followed the link to the chip in the hardware guide but maybe its been updated. Not sure.