
How to build a free and precise dosing pump DIY, with step by step instruction, with FREE ARDUINO SOFTWARE and shopping list?
In the past month i had to use a dosing pump with a great precision. As long as i collaborated with Arduino projects in the past (Ferduino above all), I decided to build this Arduino Dosing Pump DIY by myself but it had to be very simple to assemble and as much cheap as possible.
I therefore decided to publish my project for everybody as long as there is no business in it. I hope to help someone to build it .
First of all it is mandatory to make a little introduction:
- It’s a no profit project, which i do at my best, but i won’t be responsible for any damages or ANYTHING else 🙂
- You need to use this site to use this dosing pumps using my code.
- You need to have some skill with computer, and you need to be a little confortable with welder (just a little bit).
- There’ s no Rtc (real time clock) by now in these diy dosing pumps. I will use internet time, so it has to be always online. If you turn it on without connection, it will start from midnight
- I try to get the site multilingual, but as long as my english is not so good i will need help to correctly translate it.
- Don’t ask for eta for updates, or for custom functionality as long as i don’t have time for them.
This Arduino Dosing Pump DIY can have up to 6 heads. The choice of the heads depends on your needs of precision. You can save more money compared to commerial products with the high quality heads. You can build a good dosing pump wifi with something like 60 dollars buying all the materials from internet.
You have 2 ways to get the material:
- Buy everything on Amazon / Ebay / Aliexpress, wait for everything to arrive and, with a little manual skill, assemble everything as described in the next article
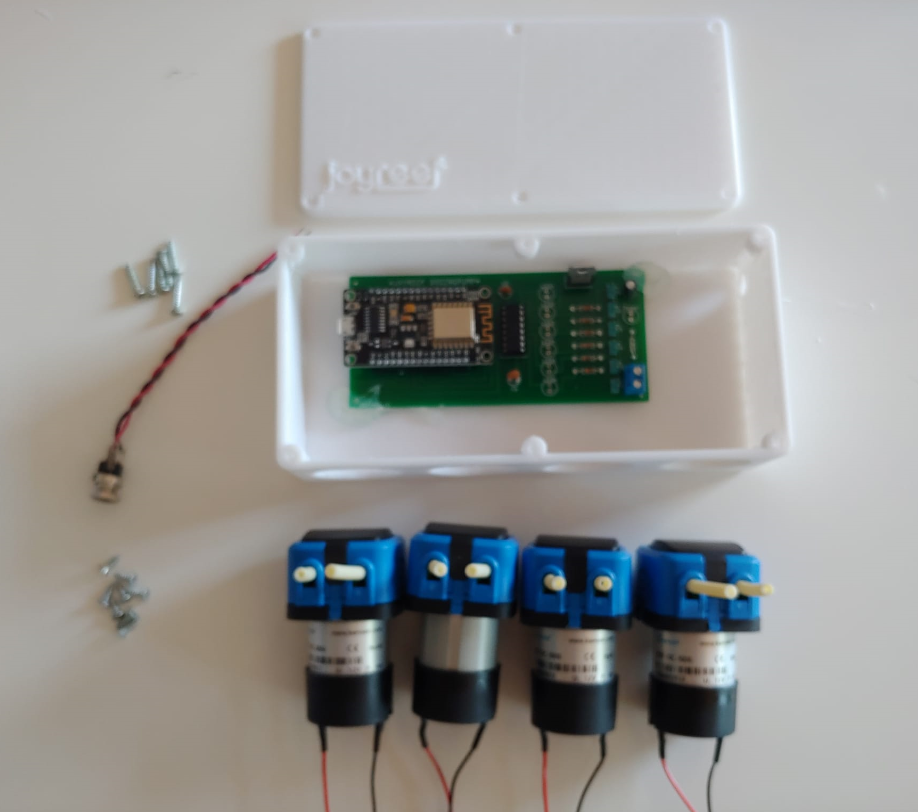
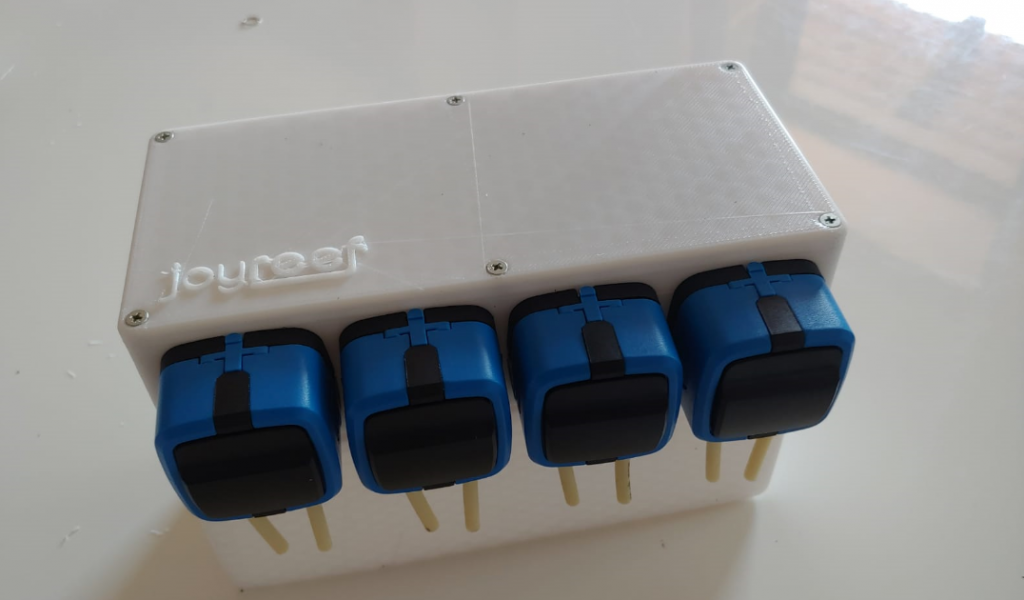
- Buy Joy-Reef Kit from our store to create your doser without welder! You will just need to tighten some screw (like IKEA table).
If you are interested in the construction kit consisting of board, processor, pumps and box already shaped, like the one in the figure, you can find it here: Shop.
Here you will find the document that explains in detail the operation and assembly of the kit: Assembling Kit
Otherwise you can proceed to buy everything piece by piece from the internet, let’s see how and where:
Let’s talk about dosing pump heads.
You can find cheap heads, that we can compare to the entry level commercial dosing pumps, or much more expendable heads, that we can compare to the best dosing pumps you can find.
My software is the same, and the building instruction the same.
Here the shopping list of all the parts needed for this project:
Kamoer KNP
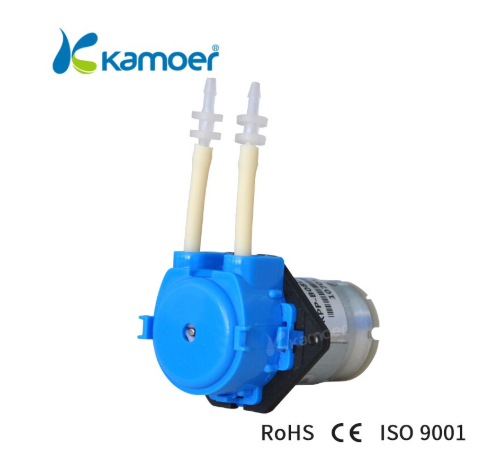
Very cheap (6$ for each one) they are the same of the cheap commercial dosing pumps
Acquistale: Kamoer KNP
Kamoer KFS
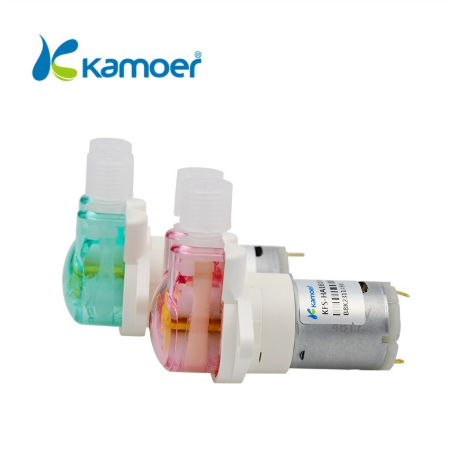
KFS is the model i bought, more expensive but very accurate. They can dose 6.2 ml in a minute.
They are the heads of many famous commercial dosing pumps.
Please note we are talking about the dc version of these heads and not about the stepper version. Stepper version is not supported.
The price is something like 35$ each.
Buy it: Kamoer KFS
Kamoer KXF
Then there are the KXFs which are a good middle ground, even though I have never personally experienced them. Indeed, if someone wanted to give me feedback on this, I wouldn’t mind.
They costs about 15$ each.

Buy: Kamoer KXF
HARDWARE:
Needless to say, the heads of the dosometers are the biggest expense. The rest of the construction material comes to around € 20 in total.ì. Below is the shopping list:
NodeMcu
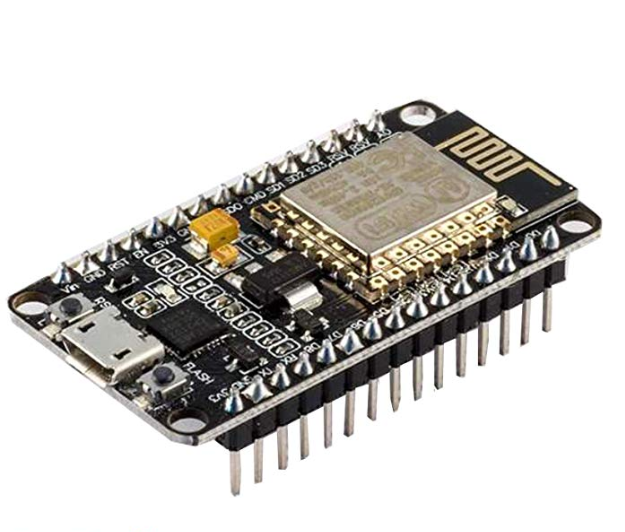
Electronic card based on the ESP8266 chip, programmable in C and compatible with Arduino. It has integrated WiFi and perfectly supports the use of the 6 pins we need to control the pumps.
Buy: NodeMCU
Circuit
The circuit required to control the pumps is as follows:
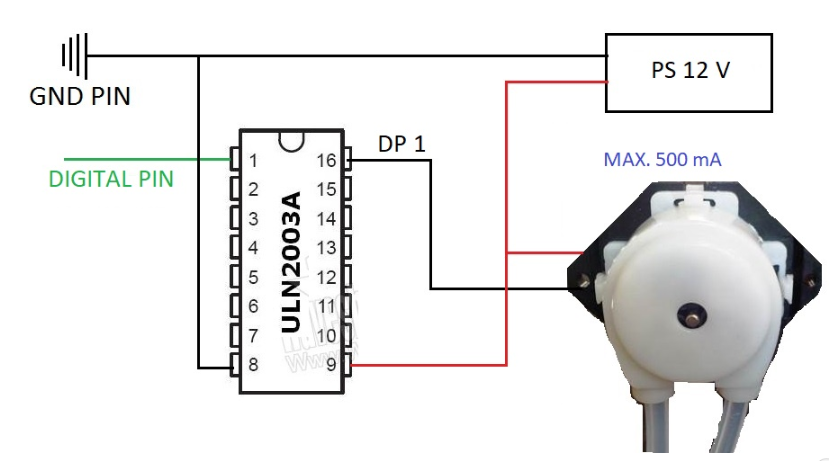
Based on the ULN2003 module that you can buy here:
Buy: ULN2003
Otherwise, if you just need a 4-channel dosometric system, the circuit already made already exists without having to do any welding.
Just buy one of those cheap stepper motor on Amazon and throw away the engine, keeping only the circuit.
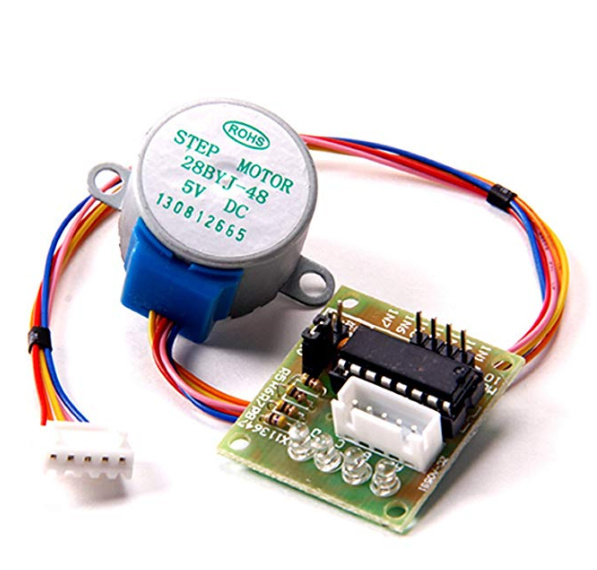
Buy: Stepper Motor
Step Down Buck Converter
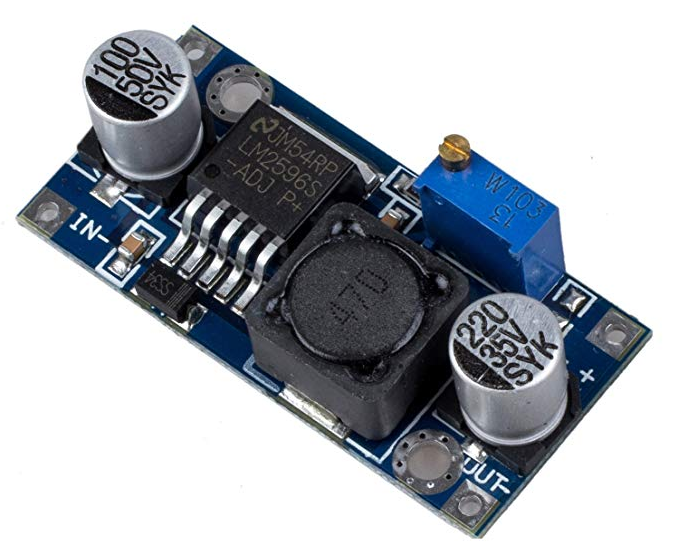
To do a good job, you will need to feed the nodemcu and the dosometrics with the same power supply. Since the dosometrics must be powered at 12v and the nodemcu at 5v, we need a voltage converter.
Buy: Converter
Cables
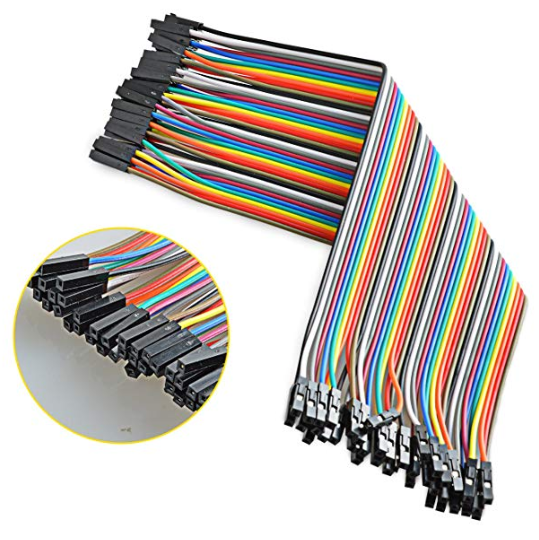
The most convenient way to connect everything is to use female dupnt cables:
Acquistalo: Cavi Femmina Femmina
Box
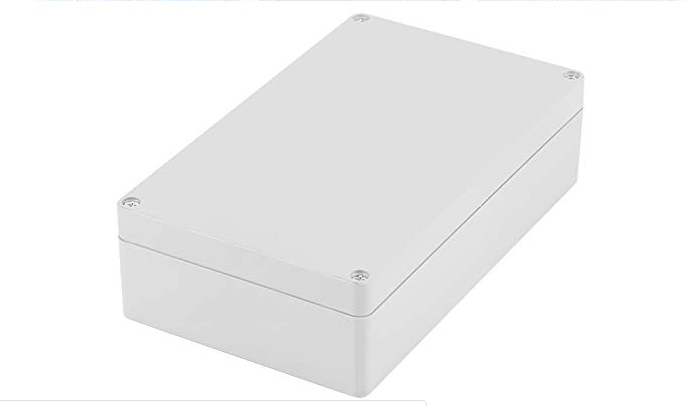
The final shape of your Arduino Dosing Pump DIY. Here you can play around as you like, print them in 3D, build them in wood, in plexiglass. The most convenient and cost-effective way I found was to use a junction box. A perfect fit for our purpose is the following, although it may be a bit expensive:
Buy: Box
12v panel connector
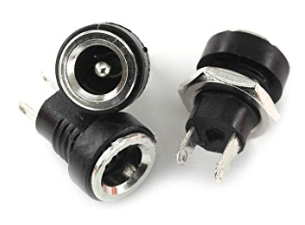
A normal panel connector for 12v power supplies. It’s better to buy it in the shop below your house because online they sell at least 10 of them and it’s not worth it
12v power supply

A normal 12v power supply unit that goes into the connectors. Surely you will have one at home, otherwise:
Buy: Power Supply
Hello DANILO. Thank you for your posting.
I have a question. I want to control the 800ma motor with your software, can I replace the uln2003 driver with l298n?
Thanks
Hello Koo,
To be honest i don’t know very well l298n, but i can tell you that i simpli provide digitalWrite(doser[i], HIGH); to turn the single pump on and digitalWrite(doser[i], LOW); to turn it off.
So if it is compatible with this signal as input, yes, you can use it 😉
Let me know if it works!
Thank you for your reply!
I’m going to make AWC system using your software.
I’ll leave another comment when the project progresses.
Thanks again.
Hellow Danilo.
I have one more question.
Do you know a driver with a high output that can replace uln2003? The output is insufficient because the motor input is 800ma.
Thanks.
The only easy soulution i can think is to use 2 ULN2003A in parallel.
Let me know
Hi Danilo,
I really appreciate your solution.
But the motor didn’t work when I connected 3 uln2003 in parallel. I need to think about solution.
Let me know if you find a solution
Is it impossible to use relay module instead of ULN2003A?
It is possible, but i don’t know about relay precision.
Just use the signal to put them on and off
Thank you again.
I change the water about 2L a day, so I don’t need too much precision.
And It’s working. But The relay works the other way around. The relay is turned off when I push save button in Manual.
I think relay turns on when digitalWrite (doser[i], LOW).
If i buy relay that works the other way around, it will be solved.
Hi Danilo – not sure if you still monitor this site!
I have just built a 6 pump version of your controller, but see that pins 0, 3 and 4 are not toggling between on and off status on the board that I have available to me. Is it possible for the arduino sketch to be available so that we can change the pins associated with each pump?
Hello Peter, pins for the pumps are: D1, D2, D5, D6, D7, D8
You should use those.
Let me know if it’s ok!
Fantastic – thank you!
Where do i find information about the board that the NodeMCU is placed on?
Hello Renè, if you mean the board you can see in the shop here, it is designed by us, and can drive up to 6 pumps.
What did you want to know?
Hello,
Do you have any experience in how accurate they are?
I need quite some accuracy and wonder if I could do exactly the ml dosing I want to.
it is very accurate.
You can check it in this video:
https://www.facebook.com/watch/?v=713166269443014
What is the smallest amount that can be accurately added at once? I assume this depends on the pump I get, but there are probably software controls limiting this as well. If I get the kfs would I be able to accurately add .1 ml at a time? Most dosers out there already only work up to 1ml minimum, but I only need to dose 1 ml in a 24 hour period so looking to build something that works better. Looks sweet and I cannot wait to start tinkering. Thanks.
Hello justin,
Software does not have a minimum. It depends on the the pump you get as you say.
In the software you can choose to dose even 1 ml a day and make it divide in 24 around the day.
Obviously it will depend on the pump, this is why there is the calibration.
Whit a KFS with double reduction you can easily get a precision of 0.05.
let me know!
Good evening
Can I ask for a joy reef dosing pump controller scheme?
Hello Tomas, no sorry we don’t provide our pcb scheme but you can find all the instruction to build it.
Good evening
I would also like to ask if it will work with Wemos D1 Mini V3.0.0
hello danilo,
i am really impressed for that project .. very nice job sir
i want to know small thing where i want to do something similar to that i already using esp32 as webserver and websocket server but the webpage is part of the code it runs in the esp32 based on request by ip . i want to do the same like you how could i upload the page to my website and let it communicate with the esp32 please if you have any documents or any article for doing such thing i appreciate you kindly help
Hello Gendia,
It’s quite complicated, you have to set up an mqtt server and let communicate your esp with it.
I have no links to show you because it’s a lot of things together.
But you have to start studying MQTT
thank you Danilo i started with mqtt and i was able to make the esp send to the broker but for the web client its so hard i even do not know how to use the ssl because it must be wss to get it works with service like hivemq.com i know its complicated but if you can just give me some material to study how to make the mqtt web client i will be grateful to you
Do you need to purchase the Arduino along with the above parts?
Which one?
No you don’t need to buy arduino. Nodemcu will do his job. All the parts are above.
Cheap DIY Smart 🤓 dosing pump
https://youtu.be/c8wvESm-Qls?si=MaWhApQznaEZ-9T5
How can I get the printed circuit board that the the NodeMCU is placed on shipped to the United States?
sadly i can’t ship to united states 🙁
I can’t help you
Hola, podría conectar varias NodeMCU a la misma web de control¿?
Para dosificar en 3 acuarios diferentes en mi casa.
Saludos
Miguel
No, sadly you have to create 3 different accounts, with 3 different emails.